- Get link
- X
- Other Apps

25 Amazing Birthday Cake Ideas for Your Next Celebration
Birthday cakes are the sweet stars of any celebration, bringing flavor and joy to the special day. From simple, classic designs to elaborate, multi-tiered creations, there's a cake for every taste and occasion. Gather your loved ones, add some candles, and let's dig into the delightful world of birthday cake!
Carrot Cake with Walnuts
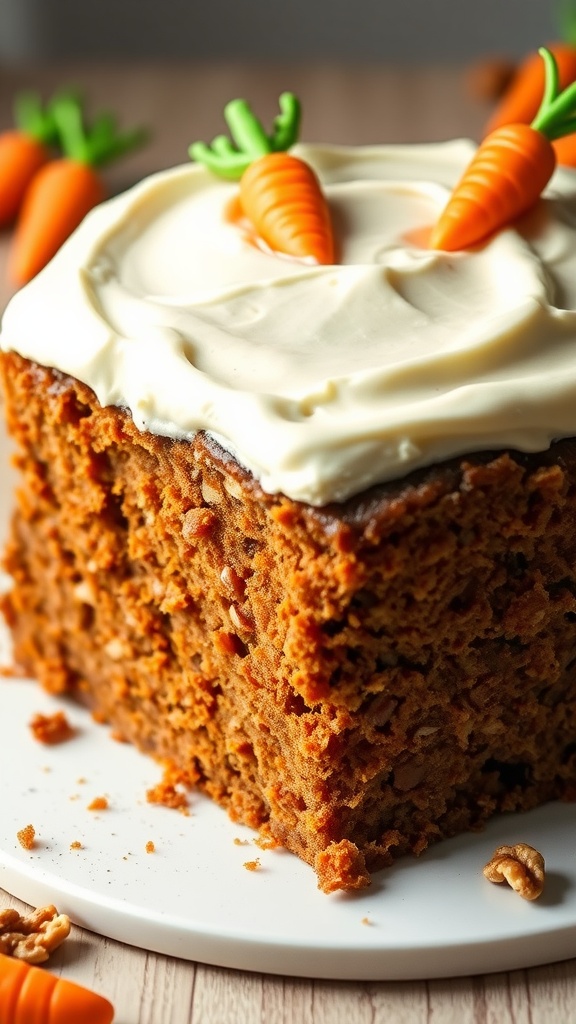
Carrot cake is a delightful twist on traditional birthday cakes. It's moist and flavorful, with the natural sweetness of carrots balancing perfectly with warm spices. The walnuts add a crunchy texture that complements the soft cake beautifully. Making this cake is quite simple, perfect for bakers of all levels!
This cake is not just delicious; it also feels wholesome with the addition of carrots and nuts. Topped with a creamy frosting, it’s a treat that everyone will love. Whether you’re celebrating a special occasion or just want a sweet snack, this carrot cake is sure to impress!
Ingredients
- 2 cups all-purpose flour
- 2 cups granulated sugar
- 1 teaspoon baking soda
- 1 teaspoon baking powder
- 1 teaspoon ground cinnamon
- 1/2 teaspoon salt
- 1 cup vegetable oil
- 4 large eggs
- 3 cups grated carrots
- 1 cup chopped walnuts
- 1 teaspoon vanilla extract
Instructions
- Preheat the oven to 350°F (175°C). Grease and flour two 9-inch round cake pans.
- In a large bowl, whisk together flour, sugar, baking soda, baking powder, cinnamon, and salt.
- In another bowl, mix the oil, eggs, grated carrots, and vanilla extract until well combined.
- Gradually add the wet ingredients to the dry ingredients, mixing just until combined. Fold in the chopped walnuts.
- Divide the batter evenly between the prepared cake pans. Bake for 25-30 minutes or until a toothpick inserted in the center comes out clean.
- Let the cakes cool in the pans for 10 minutes, then turn them out onto wire racks to cool completely. Frost with cream cheese frosting before serving.
Funfetti Cake with Whipped Cream Frosting
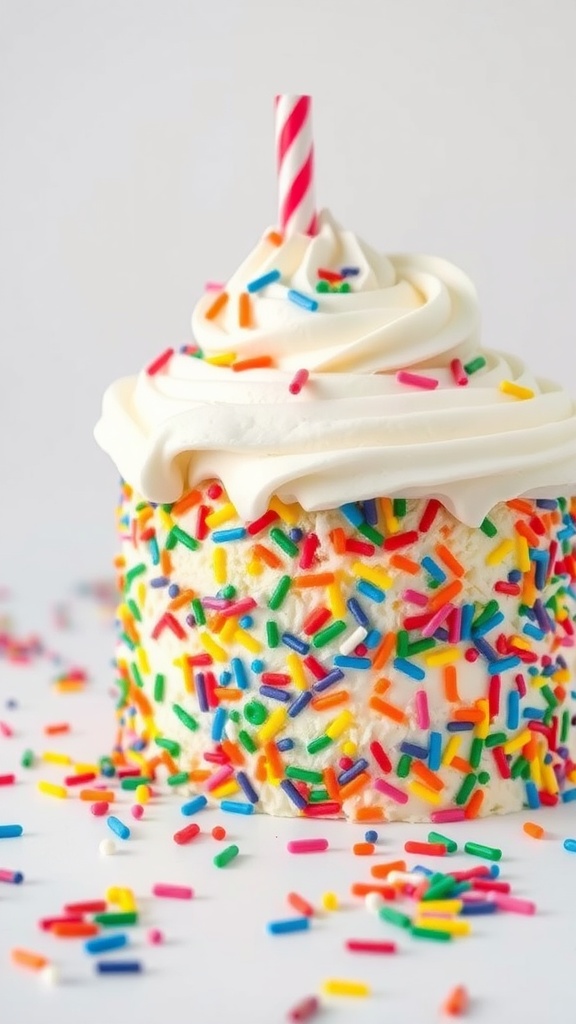
Funfetti cake is a cheerful, colorful treat that brings joy to any celebration. It's light, fluffy, and bursting with sweet sprinkles that add a delightful crunch and a pop of color to every slice. This cake is simple to make and perfect for birthdays, making it a go-to favorite for both kids and adults.
The whipped cream frosting adds a smooth, creamy finish that perfectly complements the cake's sweetness. It's an easy recipe that doesn't require any fancy tools or techniques, so anyone can whip it up with a little bit of time and love.
Ingredients
- 2 1/2 cups all-purpose flour
- 2 1/2 tsp baking powder
- 1/2 tsp salt
- 1 cup unsalted butter, softened
- 2 cups granulated sugar
- 4 large eggs
- 1 tsp vanilla extract
- 1 cup milk
- 1 cup rainbow sprinkles
Instructions
- Preheat the oven to 350°F (175°C). Grease and flour two 9-inch round cake pans.
- In a bowl, whisk together flour, baking powder, and salt. Set aside.
- In a large bowl, cream the butter and sugar until light and fluffy. Beat in the eggs one at a time, then stir in the vanilla.
- Add the dry ingredients alternately with the milk, mixing until just combined. Gently fold in the sprinkles.
- Divide the batter evenly between the prepared pans and smooth the tops. Bake for 25-30 minutes or until a toothpick comes out clean.
- Allow the cakes to cool in the pans for 10 minutes, then transfer to a wire rack to cool completely.
- For the whipped cream frosting, beat 2 cups of heavy cream with 1/4 cup of powdered sugar and 1 tsp of vanilla until soft peaks form. Frost the cooled cakes and add extra sprinkles on top!
Red Velvet Cake with Cream Cheese Frosting
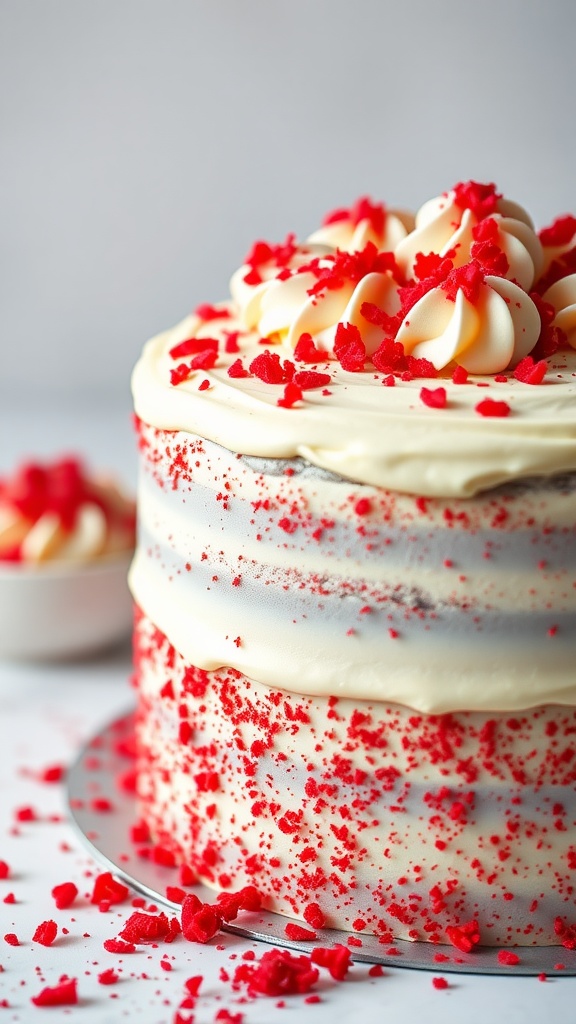
Red velvet cake is a classic dessert that combines rich cocoa flavor with a hint of tanginess from buttermilk, resulting in a unique taste that’s both sweet and slightly tart. Its striking red color makes it a showstopper at any birthday party or celebration. The addition of cream cheese frosting adds a creamy, tangy layer that perfectly complements the cake’s flavors.
This recipe is quite simple to make, requiring basic baking skills and ingredients you may already have at home. Whether you're a baking novice or a seasoned pro, this red velvet cake will impress your guests and satisfy your sweet tooth!
Ingredients
- 2 1/2 cups all-purpose flour
- 1 1/2 cups granulated sugar
- 1 teaspoon baking soda
- 1 teaspoon salt
- 1 teaspoon cocoa powder
- 1 1/2 cups vegetable oil
- 1 cup buttermilk, room temperature
- 2 large eggs, room temperature
- 2 tablespoons red food coloring
- 1 teaspoon vanilla extract
- 1 teaspoon white vinegar
- 16 oz cream cheese, softened
- 8 oz unsalted butter, softened
- 4 cups powdered sugar
- 1 teaspoon vanilla extract (for frosting)
Instructions
- Preheat the Oven: Preheat your oven to 350°F (175°C). Grease and flour two 9-inch round cake pans.
- Mix Dry Ingredients: In a large bowl, whisk together flour, sugar, baking soda, salt, and cocoa powder.
- Combine Wet Ingredients: In another bowl, mix together the oil, buttermilk, eggs, food coloring, vanilla, and vinegar until smooth.
- Combine Mixtures: Gradually add the wet ingredients to the dry ingredients, mixing until just combined.
- Bake: Divide the batter evenly between the prepared pans and bake for 25-30 minutes, or until a toothpick inserted in the center comes out clean. Let the cakes cool in the pans for 10 minutes, then transfer to wire racks to cool completely.
- Make the Frosting: In a mixing bowl, beat the cream cheese and butter together until creamy. Gradually add powdered sugar and vanilla extract, mixing until smooth and fluffy.
- Assemble the Cake: Place one cake layer on a serving plate. Spread a layer of cream cheese frosting on top. Add the second layer and frost the top and sides of the cake. Decorate as desired, and enjoy!
Chocolate Chip Cookie Cake
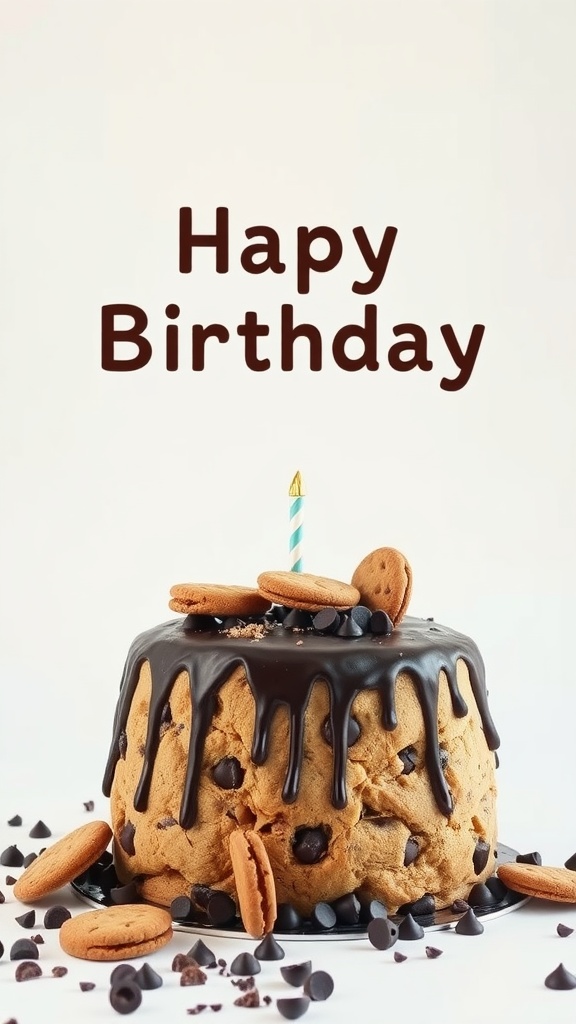
Chocolate chip cookie cake is a fun twist on traditional birthday treats. This cake is soft, chewy, and loaded with chocolate chips, making it a crowd-pleaser. It's perfect for those who love the comforting taste of homemade cookies but want a cake for their special day.
This recipe is simple enough for bakers of any level. With just a few ingredients, you can whip up a delicious cake that feels like a giant cookie. Top it off with chocolate ganache and extra cookie pieces for a birthday celebration that everyone will remember!
Ingredients
- 2 1/4 cups all-purpose flour
- 1 teaspoon baking soda
- 1/2 teaspoon salt
- 3/4 cup unsalted butter, softened
- 3/4 cup granulated sugar
- 3/4 cup brown sugar, packed
- 1 teaspoon vanilla extract
- 2 large eggs
- 2 cups chocolate chips
- 1/2 cup chocolate frosting (for drizzling)
- Extra cookie pieces for decoration
Instructions
- Preheat the oven to 350°F (175°C). Grease a round cake pan and set aside.
- In a bowl, whisk together the flour, baking soda, and salt. Set aside.
- In another large bowl, cream the softened butter with granulated and brown sugars until light and fluffy. Mix in the vanilla extract and eggs, one at a time.
- Gradually add the dry ingredients to the wet mixture and stir until just combined. Fold in the chocolate chips.
- Pour the batter into the prepared cake pan and smooth the top. Bake for 25-30 minutes, or until a toothpick inserted into the center comes out clean.
- Let the cake cool in the pan for about 10 minutes before transferring to a wire rack to cool completely.
- Once cooled, drizzle chocolate frosting on top and decorate with extra cookie pieces. Slice and serve to enjoy a delightful birthday cake!
Rainbow Layer Cake
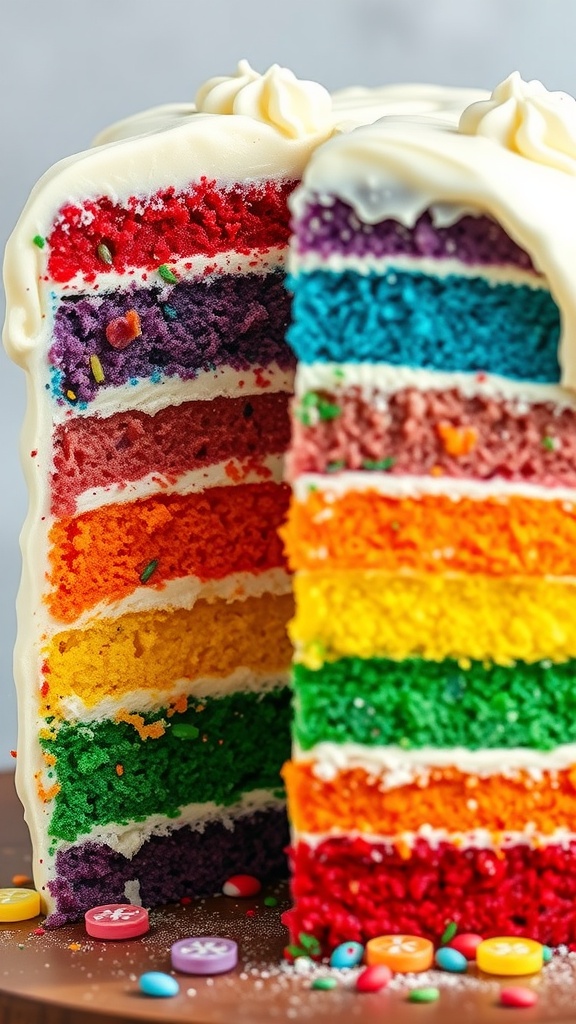
This Rainbow Layer Cake is a fun, colorful treat that will brighten up any birthday celebration. Each layer is infused with vibrant colors, making it not only a feast for the taste buds but also a visual delight. The cake is fluffy and moist, paired perfectly with a smooth and creamy frosting.
Making this cake is easier than it looks! With simple ingredients and a few extra steps for coloring, you can create a stunning dessert that everyone will love. It's perfect for kids and adults alike, bringing joy to any gathering.
Ingredients
- 2 ¾ cups all-purpose flour
- 2 ½ teaspoons baking powder
- ½ teaspoon salt
- 1 cup unsalted butter, softened
- 2 cups granulated sugar
- 4 large eggs
- 1 teaspoon vanilla extract
- 1 cup whole milk
- Food coloring (red, orange, yellow, green, blue, purple)
- 4 cups frosting (buttercream or cream cheese)
- Sprinkles for decoration
Instructions
- Preheat your oven to 350°F (175°C). Grease and flour six 9-inch round cake pans.
- In a bowl, whisk together flour, baking powder, and salt.
- In a separate large bowl, beat softened butter and sugar together until light and fluffy. Add in the eggs one at a time, mixing well after each addition, then stir in the vanilla extract.
- Alternately add the flour mixture and milk to the butter mixture, starting and ending with the flour mixture. Mix until just combined.
- Divide the batter evenly into six bowls. Add food coloring to each bowl to create the desired colors of the rainbow.
- Pour each color batter into the prepared cake pans and bake for 20-25 minutes or until a toothpick comes out clean.
- Let the cakes cool in the pans for 10 minutes before transferring them to wire racks to cool completely.
- Once cooled, layer the cakes starting with the red layer on a serving plate. Spread frosting between each layer, then frost the top and sides of the cake.
- Decorate with sprinkles and serve to enjoy the colorful surprise inside!
Classic Vanilla Birthday Cake
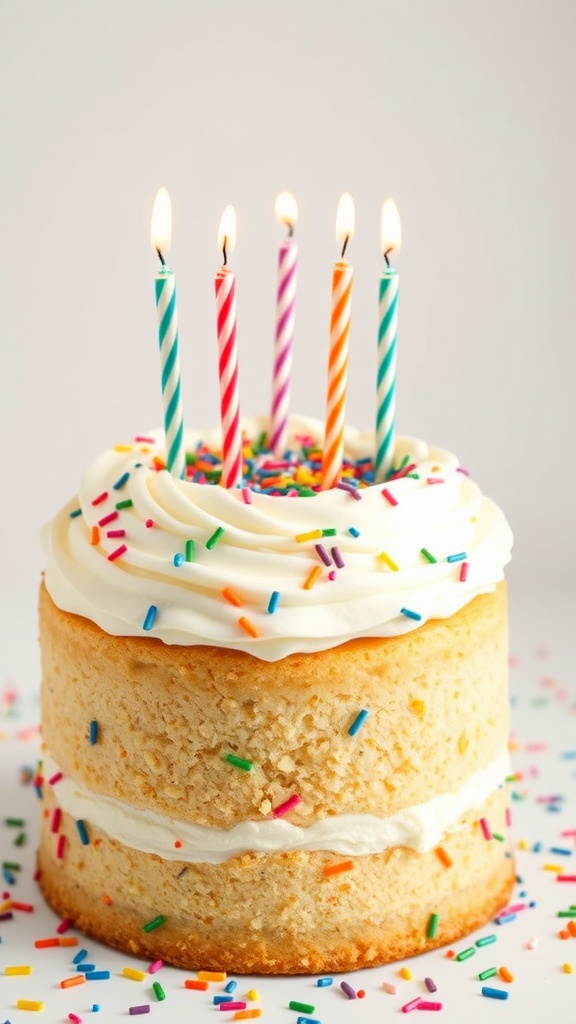
This Classic Vanilla Birthday Cake is a timeless favorite that never fails to bring joy to any celebration. It's light, fluffy, and perfectly sweet, making it a delightful treat for both kids and adults alike. Even if you’re new to baking, this recipe is straightforward and gives you a delicious result every time.
With layers of soft vanilla cake and creamy frosting, it’s the ideal canvas for colorful sprinkles and festive candles. This cake not only tastes amazing but also looks stunning on any birthday table. Let’s get into how you can create this crowd-pleaser at home!
Ingredients
- 2 1/2 cups all-purpose flour
- 2 1/2 teaspoons baking powder
- 1/2 teaspoon baking soda
- 1/4 teaspoon salt
- 1 cup unsalted butter, softened
- 2 cups granulated sugar
- 4 large eggs
- 1 tablespoon vanilla extract
- 1 cup buttermilk
- 2 cups frosting (store-bought or homemade)
- Colored sprinkles for decoration
Instructions
- Preheat your oven to 350°F (175°C). Grease and flour two 9-inch round cake pans.
- In a bowl, whisk together flour, baking powder, baking soda, and salt. Set aside.
- In another large bowl, cream the butter and sugar together until light and fluffy. This should take about 3-4 minutes.
- Add the eggs one at a time, mixing well after each addition. Stir in the vanilla extract.
- Gradually add the dry ingredients to the wet mixture, alternating with the buttermilk. Start and end with the dry ingredients, mixing until just combined.
- Divide the batter evenly between the prepared cake pans. Bake for 25-30 minutes, or until a toothpick inserted in the center comes out clean.
- Let the cakes cool in the pans for 10 minutes before transferring them to wire racks to cool completely.
- Once cooled, frost the top of one layer, place the second layer on top, and frost the top and sides of the cake. Finish with colorful sprinkles and candles.
Lemon Zest Birthday Cake
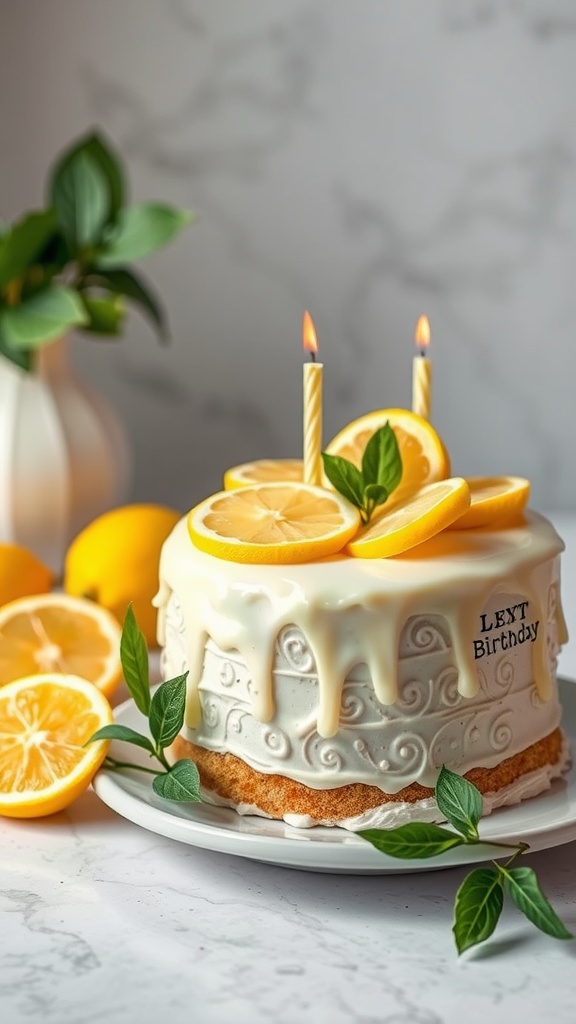
This Lemon Zest Birthday Cake is a refreshing twist on the classic birthday treat. Bursting with citrus flavor, it's light and moist, making it perfect for celebrations. Simple to prepare, this cake is sure to impress your guests with its delightful taste and bright presentation.
The combination of fresh lemon zest and a creamy frosting creates a balance that's both sweet and tangy. Whether you're celebrating a birthday or just craving something sweet, this cake is an excellent choice!
Ingredients
- 2 cups all-purpose flour
- 1 ½ cups granulated sugar
- 1 tablespoon baking powder
- ½ teaspoon salt
- ¾ cup unsalted butter, softened
- 1 cup milk
- 4 large eggs
- 2 tablespoons lemon zest
- 1 teaspoon vanilla extract
- 1 cup powdered sugar
- 2 tablespoons lemon juice
- 1 cup heavy cream
- Fresh lemon slices and mint leaves for garnish
Instructions
- Preheat your oven to 350°F (175°C). Grease and flour two 9-inch round cake pans.
- In a large bowl, combine flour, sugar, baking powder, and salt. Add softened butter, milk, eggs, lemon zest, and vanilla extract. Mix until smooth.
- Divide the batter evenly between the prepared pans and bake for 25-30 minutes or until a toothpick comes out clean.
- Let the cakes cool in the pans for 10 minutes before transferring to wire racks to cool completely.
- For the frosting, whip heavy cream until soft peaks form, then gradually add powdered sugar and lemon juice until smooth.
- Once the cakes are cool, spread frosting between the layers and over the top and sides of the cake.
- Garnish with fresh lemon slices and mint leaves. Enjoy your delicious Lemon Zest Birthday Cake!
Decadent Chocolate Layer Cake
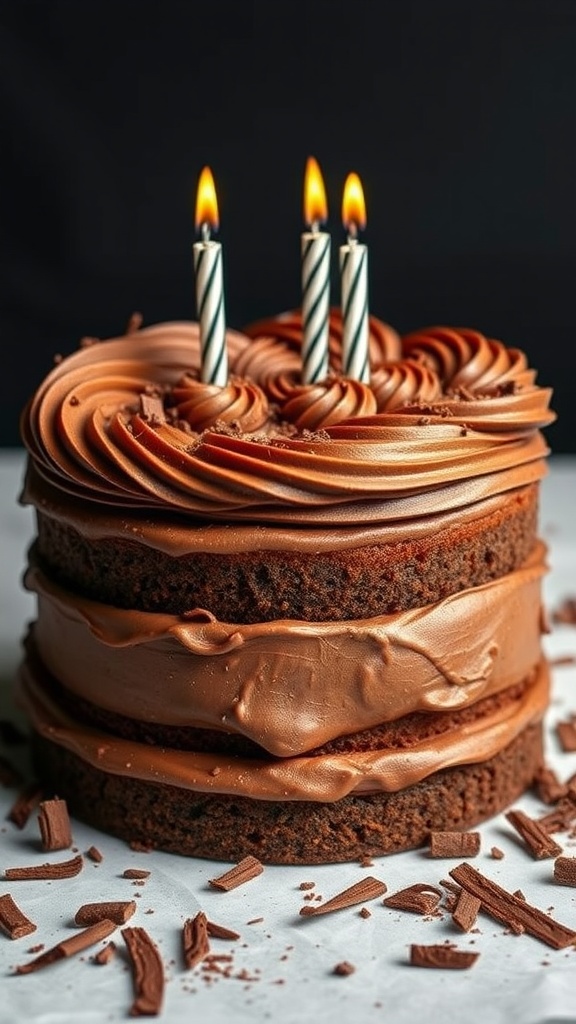
This chocolate layer cake is a true delight for any celebration. With its rich chocolate flavor and creamy frosting, it’s sure to satisfy any sweet tooth. It's fairly simple to make, even for those who might not consider themselves bakers.
Each layer of moist chocolate cake is filled and topped with a luscious chocolate frosting that melts in your mouth. Whether it's for a birthday or any special occasion, this cake is a crowd-pleaser that brings smiles and satisfied taste buds.
Ingredients
- 1 3/4 cups all-purpose flour
- 3/4 cup unsweetened cocoa powder
- 2 cups granulated sugar
- 1 1/2 teaspoons baking powder
- 1 1/2 teaspoons baking soda
- 1 teaspoon salt
- 2 large eggs
- 1 cup whole milk
- 1/2 cup vegetable oil
- 2 teaspoons vanilla extract
- 1 cup boiling water
- 1 cup unsalted butter, softened
- 4 cups powdered sugar
- 1/2 cup unsweetened cocoa powder
- 1/4 cup heavy cream
Instructions
- Preheat your oven to 350°F (175°C). Grease and flour two 9-inch round cake pans.
- In a large bowl, mix together flour, cocoa powder, sugar, baking powder, baking soda, and salt.
- Add eggs, milk, oil, and vanilla extract to the dry ingredients. Beat on medium speed for 2 minutes. Stir in boiling water (the batter will be thin).
- Pour the batter evenly into the prepared pans. Bake for 30-35 minutes, or until a toothpick inserted in the center comes out clean.
- Let the cakes cool for 10 minutes in the pans, then remove them from the pans and cool completely on wire racks.
- For the frosting, beat softened butter in a bowl until smooth. Gradually add powdered sugar and cocoa powder, then mix in heavy cream until the desired consistency is achieved.
- Once the cakes are cool, spread frosting between the layers and on the top and sides of the cake. Enjoy your celebration!
Coconut Cream Birthday Cake
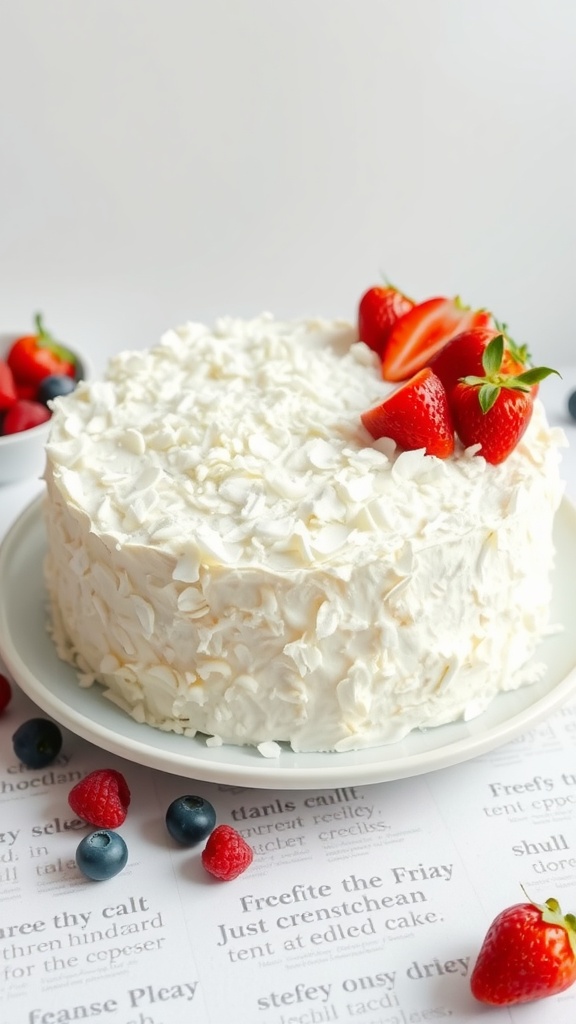
Coconut Cream Birthday Cake is a delightful treat that perfectly combines the light, airy texture of cake with the rich, tropical flavor of coconut. Each slice is a sweet escape, featuring layers of moist coconut cake frosted with luscious cream. It’s a great choice for celebrations, bringing a refreshing twist to the traditional birthday cake.
This recipe is fairly simple to follow, making it a fantastic option for bakers of all levels. With just a few ingredients and some love, you'll have a show-stopping cake that is sure to impress your guests.
Ingredients
- 2 cups all-purpose flour
- 1 1/2 cups granulated sugar
- 1 tablespoon baking powder
- 1/2 teaspoon salt
- 1 cup unsweetened coconut milk
- 1/2 cup unsalted butter, softened
- 3 large eggs
- 1 teaspoon vanilla extract
- 1 cup shredded coconut (sweetened or unsweetened)
- 2 cups heavy cream
- 1 cup powdered sugar
- 1/2 cup toasted coconut flakes, for garnish
Instructions
- Preheat your oven to 350°F (175°C) and grease two 9-inch round cake pans.
- In a mixing bowl, whisk together flour, baking powder, and salt. In another bowl, beat together sugar and butter until fluffy, then add eggs one at a time, mixing well after each addition.
- Gradually mix in the coconut milk and the vanilla extract. Slowly incorporate the dry ingredients into the wet mixture until just combined. Fold in the shredded coconut.
- Divide the batter evenly between the prepared pans and bake for 25-30 minutes or until a toothpick inserted in the center comes out clean.
- Let the cakes cool in the pans for 10 minutes before transferring them to a wire rack to cool completely.
- For the frosting, whip the heavy cream and powdered sugar together until stiff peaks form. Spread a layer of whipped cream between the cooled cake layers and frost the top and sides of the cake with the remaining cream.
- Finish by sprinkling toasted coconut flakes on top for a beautiful garnish. Enjoy your Coconut Cream Birthday Cake!
Churro Cake with Cinnamon Sugar
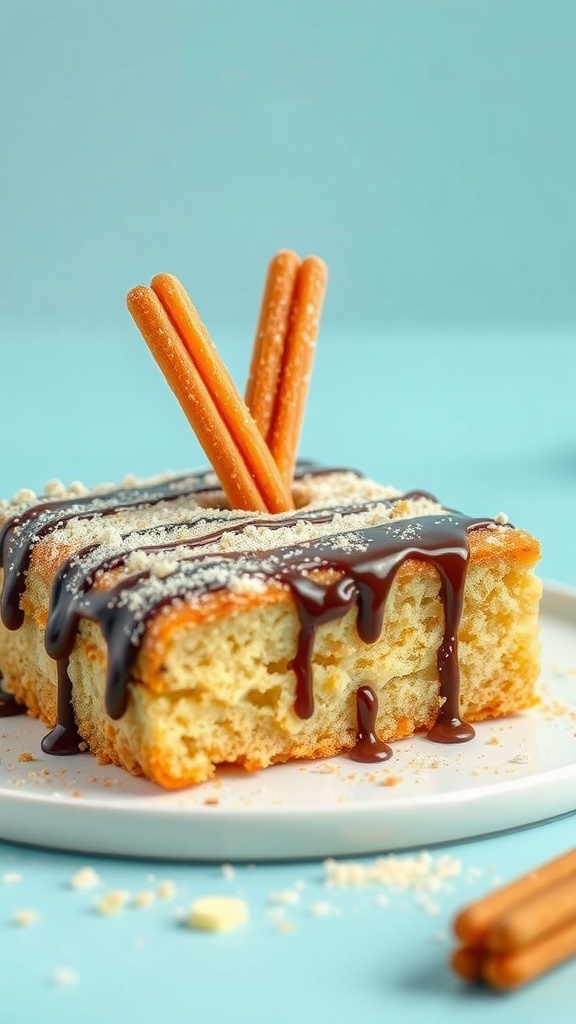
This churro cake is a delightful twist on the classic treat, combining the soft, moist texture of cake with the warm, comforting flavors of cinnamon and sugar. It’s perfect for a birthday celebration or any special occasion. With a buttery cake base topped with a rich chocolate drizzle and crispy churro sticks, it offers a unique taste that everyone will love.
Making this cake is straightforward, even for beginner bakers. The combination of flavors is sure to impress, and the presentation is simply fun! Grab your ingredients and let’s get baking!
Ingredients
- 1 box yellow cake mix
- 1/2 cup unsalted butter, melted
- 3 large eggs
- 1 cup milk
- 1 tablespoon vanilla extract
- 1 cup granulated sugar
- 2 tablespoons ground cinnamon
- 1 cup chocolate sauce
- Churro sticks for decoration
Instructions
- Preheat the oven to 350°F (175°C). Grease and flour a 9x13 inch baking pan.
- In a large bowl, combine the cake mix, melted butter, eggs, milk, and vanilla extract. Mix until smooth.
- In a separate bowl, mix the granulated sugar and cinnamon together. Stir half of this mixture into the cake batter.
- Pour the batter into the prepared pan and bake for about 30-35 minutes, or until a toothpick comes out clean.
- Once baked, let the cake cool. Drizzle the top with chocolate sauce and sprinkle the remaining cinnamon-sugar mixture over it.
- Finally, add churro sticks on top for a fun decoration. Slice and serve!
Almond Joy Cake
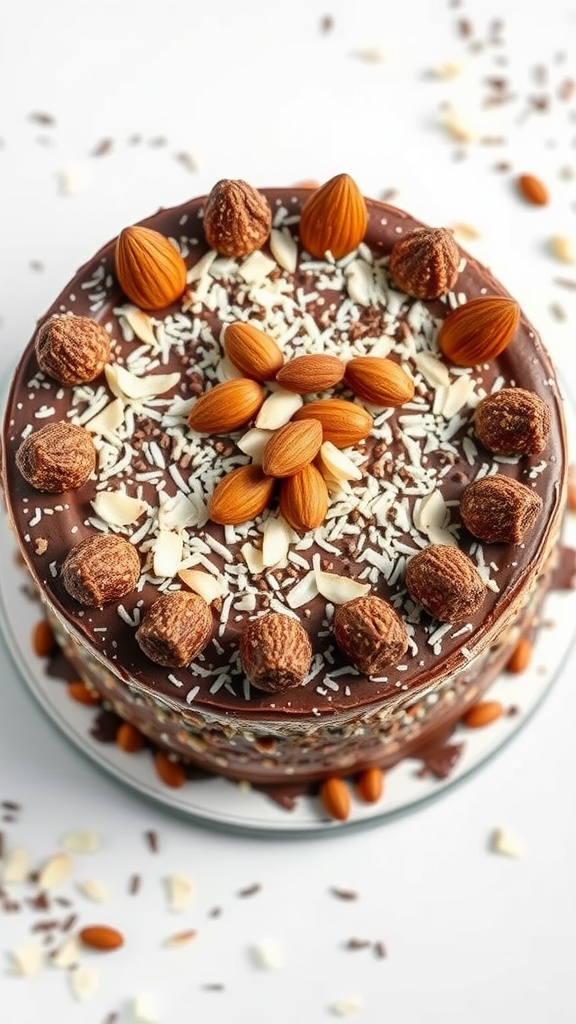
This Almond Joy Cake is a delightful treat that captures the essence of the beloved candy bar. With layers of moist chocolate cake, creamy coconut filling, and rich chocolate ganache, it’s like a party for your taste buds. The addition of crunchy almonds adds texture and a nutty flavor, making every bite a joyous experience.
The best part? It’s surprisingly simple to whip up! Whether you're celebrating a birthday or just treating yourself, this cake will impress your family and friends without requiring too much effort.
Ingredients
- 1 ¾ cups all-purpose flour
- 1 ¾ cups granulated sugar
- ¾ cup unsweetened cocoa powder
- 1 ½ teaspoons baking powder
- 1 ½ teaspoons baking soda
- 1 teaspoon salt
- 2 large eggs
- 1 cup whole milk
- ½ cup vegetable oil
- 2 teaspoons vanilla extract
- 1 cup boiling water
- 1 cup sweetened shredded coconut
- 1 cup heavy cream
- 8 ounces semisweet chocolate, chopped
- ½ cup toasted almonds, chopped
Instructions
- Preheat your oven to 350°F (175°C). Grease and flour two 9-inch round cake pans.
- In a large bowl, combine flour, sugar, cocoa powder, baking powder, baking soda, and salt. Mix well.
- Add eggs, milk, oil, and vanilla to the dry ingredients. Beat for 2 minutes on medium speed. Stir in boiling water until well combined.
- Pour the batter evenly into the prepared pans. Bake for 30-35 minutes or until a toothpick inserted in the center comes out clean.
- While the cakes are cooling, prepare the ganache by heating the heavy cream until it just begins to simmer. Pour it over the chopped chocolate and let sit for a few minutes, then stir until smooth.
- Once the cakes are cool, place one layer on a serving plate. Spread half of the coconut over the top, followed by half of the ganache. Repeat with the second layer.
- Decorate the top with chopped almonds and additional shredded coconut. Slice and enjoy your homemade Almond Joy Cake!
Salted Caramel Cake
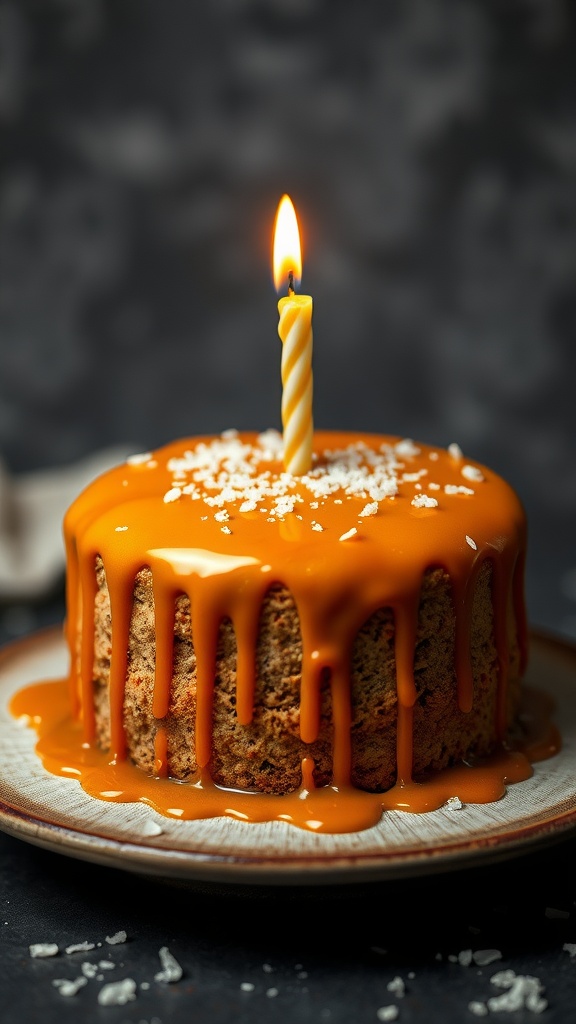
This salted caramel cake is a delightful treat that combines a moist cake with rich caramel flavors and a hint of saltiness. It’s sweet but balanced, perfect for any celebration. Plus, making it is easier than you might think!
The cake offers a satisfying texture, light and fluffy, paired with a creamy salted caramel frosting that just melts in your mouth. It’s a showstopper that will impress your guests without causing too much stress in the kitchen.
Ingredients
- 2 cups all-purpose flour
- 1 1/2 cups granulated sugar
- 1/2 cup unsalted butter, softened
- 1 cup buttermilk
- 3 large eggs
- 1 tablespoon baking powder
- 1 teaspoon vanilla extract
- 1/2 teaspoon salt
- 1 cup caramel sauce
- 1/4 teaspoon flaky sea salt for garnish
Instructions
- Preheat the oven to 350°F (175°C) and grease two 9-inch round cake pans.
- In a large bowl, combine flour, sugar, baking powder, and salt. Add the butter and mix until crumbly.
- In another bowl, whisk together buttermilk, eggs, and vanilla. Gradually mix this into the dry ingredients until just combined.
- Divide the batter evenly between the prepared pans and bake for 25-30 minutes or until a toothpick comes out clean.
- Let the cakes cool in the pans for 10 minutes, then transfer to wire racks to cool completely.
- Once cooled, layer the cakes with caramel sauce between them and spread the remaining caramel on top. Finish with a sprinkle of flaky sea salt.
Tiramisu Birthday Cake

This Tiramisu Birthday Cake combines the classic flavors of coffee and cocoa with the festive joy of a birthday celebration. It features layers of rich, coffee-soaked cake interspersed with creamy mascarpone filling, making every bite a delight. It's not too difficult to whip up, so it's perfect for both novice bakers and seasoned pros looking to impress.
The cake is light yet indulgent, offering a wonderful balance of sweetness and a hint of bitterness from the espresso. It's a unique twist on traditional birthday cakes and is sure to be a hit at any celebration!
Ingredients
- 1 cup strong brewed coffee, cooled
- 1/2 cup granulated sugar
- 1 cup all-purpose flour
- 1/4 cup cocoa powder
- 1 teaspoon baking powder
- 1/2 teaspoon salt
- 3 large eggs
- 1/2 cup unsalted butter, melted
- 1 teaspoon vanilla extract
- 1 cup mascarpone cheese
- 1 cup heavy cream
- 1/4 cup powdered sugar
- Cocoa powder for dusting
- Chocolate chips for garnish
Instructions
- Brew the Coffee: Start by brewing a strong cup of coffee and let it cool.
- Prepare the Cake Batter: In a bowl, mix together flour, cocoa powder, baking powder, and salt. In another bowl, whisk eggs and sugar until fluffy. Add melted butter and vanilla, then mix in dry ingredients until just combined.
- Bake the Cake: Divide the batter into two greased 9-inch round cake pans. Bake at 350°F (175°C) for 25-30 minutes. Once baked, let them cool.
- Soak the Cakes: Once cooled, soak each cake layer with the brewed coffee, allowing it to absorb the flavor.
- Make the Filling: In another bowl, whip the heavy cream with powdered sugar until soft peaks form. Gently fold in the mascarpone cheese until smooth.
- Assemble the Cake: Place one layer of cake on a serving plate, spread half the mascarpone filling on top, then add the second layer of cake. Top with the remaining filling.
- Finish and Serve: Dust the top with cocoa powder and garnish with chocolate chips. Allow the cake to chill in the fridge for about an hour before serving.
Peanut Butter Cup Cake
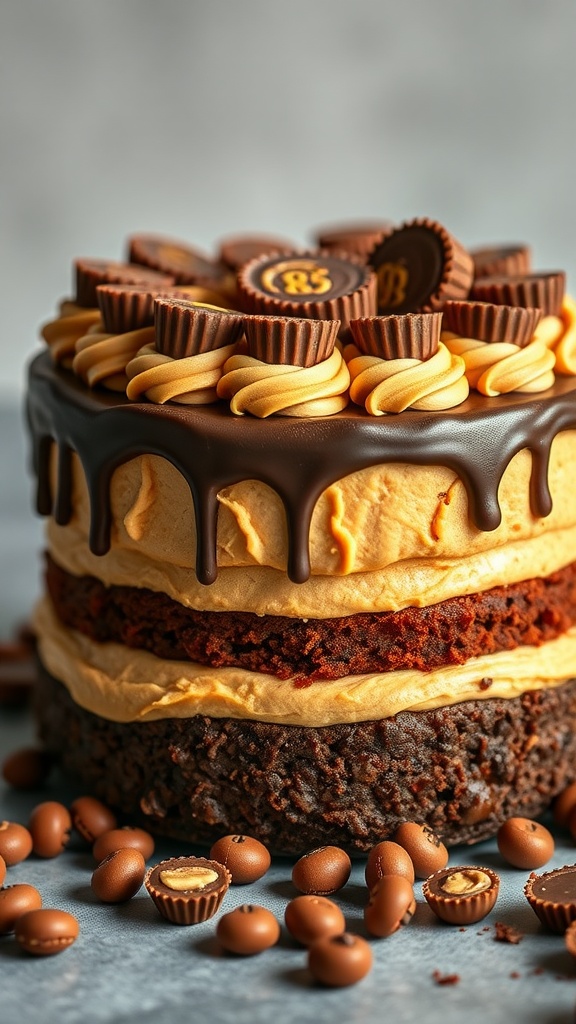
This Peanut Butter Cup Cake is a delightful treat that perfectly combines rich chocolate flavors with creamy peanut butter frosting. Each bite is an indulgence, featuring layers of moist chocolate cake and a velvety peanut butter filling, making it an ideal dessert for any celebration.
Not only is this cake delicious, but it's also simple to make, so you can whip it up for birthdays or any special occasion with ease. The addition of peanut butter cups on top adds a fun and festive touch that everyone will love.
Ingredients
- 1 ¾ cups all-purpose flour
- 1 ¾ cups granulated sugar
- ¾ cup unsweetened cocoa powder
- 1 ½ teaspoons baking powder
- 1 ½ teaspoons baking soda
- 1 teaspoon salt
- 2 large eggs
- 1 cup whole milk
- ½ cup vegetable oil
- 2 teaspoons vanilla extract
- 1 cup boiling water
- 1 cup creamy peanut butter
- 1 cup powdered sugar
- 1 cup heavy cream
- ½ cup chocolate chips
- 6-8 peanut butter cups, halved for decoration
Instructions
- Prepare the Cake: Preheat the oven to 350°F (175°C). Grease and flour two 9-inch round cake pans. In a large bowl, mix together the flour, sugar, cocoa powder, baking powder, baking soda, and salt.
- Add the Wet Ingredients: Add eggs, milk, oil, and vanilla to the dry ingredients. Beat on medium speed for about 2 minutes. Carefully stir in the boiling water. The batter will be thin.
- Bake: Pour the batter evenly into the prepared pans. Bake for 30-35 minutes or until a toothpick inserted into the center comes out clean. Let the cakes cool in the pans for 10 minutes before transferring them to wire racks to cool completely.
- Make the Frosting: In a medium bowl, beat peanut butter and powdered sugar until smooth. In another bowl, whip the heavy cream until stiff peaks form. Gently fold the whipped cream into the peanut butter mixture until well combined.
- Assemble the Cake: Place one cake layer on a serving plate. Spread a generous amount of peanut butter frosting on top. Add the second cake layer and frost the top and sides of the cake. Melt chocolate chips and drizzle over the frosting.
- Decorate: Top the cake with halved peanut butter cups for a finishing touch. Slice and enjoy!
Nutella Swirl Cake
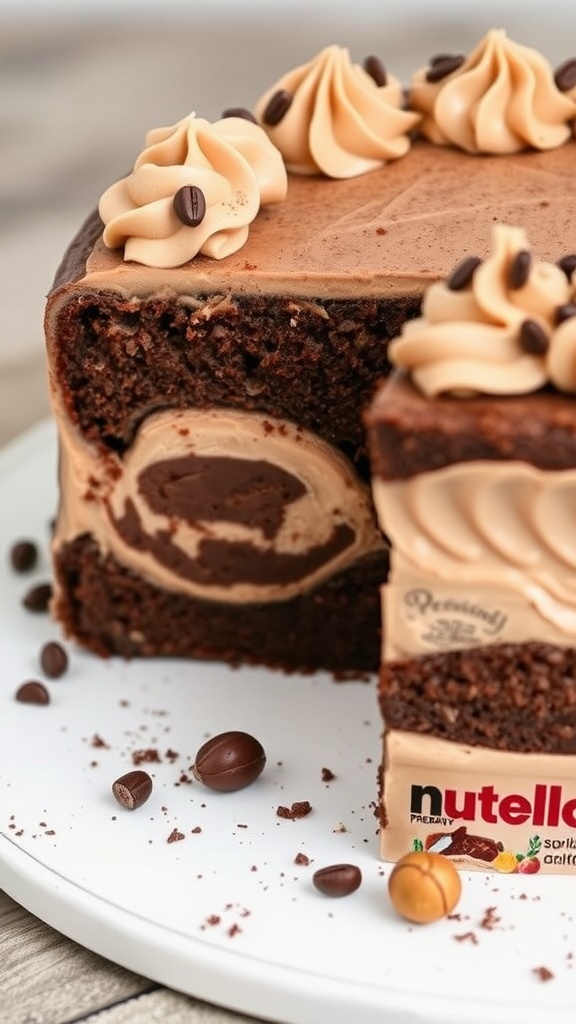
This Nutella Swirl Cake is a delightful treat that combines rich chocolate flavors with the creamy, nutty goodness of Nutella. The cake is moist, with a beautiful marbled effect that makes it visually impressive yet simple to make. Perfect for birthday celebrations or any sweet occasion, it’s sure to please chocolate lovers of all ages!
The cake is easy to whip up, making it a great choice for both novice bakers and seasoned pros. With its fluffy texture and a creamy Nutella center, each slice offers a heavenly combination of taste and texture. Let’s dive into the ingredients and instructions to create this delicious masterpiece!
Ingredients
- 2 cups all-purpose flour
- 1 ½ cups granulated sugar
- 1 cup unsweetened cocoa powder
- 1 ½ teaspoons baking powder
- 1 ½ teaspoons baking soda
- 1 teaspoon salt
- 2 large eggs
- 1 cup whole milk
- ½ cup vegetable oil
- 2 teaspoons vanilla extract
- 1 cup boiling water
- 1 cup Nutella
Instructions
- Preheat the Oven: Preheat your oven to 350°F (175°C) and grease two 9-inch round cake pans.
- Mix Dry Ingredients: In a large bowl, whisk together the flour, sugar, cocoa powder, baking powder, baking soda, and salt.
- Add Wet Ingredients: Add the eggs, milk, oil, and vanilla to the flour mixture. Mix until just combined. Slowly pour in the boiling water, mixing until smooth.
- Prepare the Nutella Swirl: In a small bowl, add the Nutella and stir to soften it. Take about 1 cup of the cake batter and mix it with the Nutella until well combined.
- Assemble the Cake: Pour half of the plain batter into each prepared cake pan. Then, drop spoonfuls of the Nutella mixture on top of the batter. Use a knife to swirl the Nutella into the batter.
- Bake: Bake in the preheated oven for 30-35 minutes, or until a toothpick inserted in the center comes out clean. Let the cakes cool in the pans for about 10 minutes before transferring them to wire racks to cool completely.
Matcha Green Tea Cake
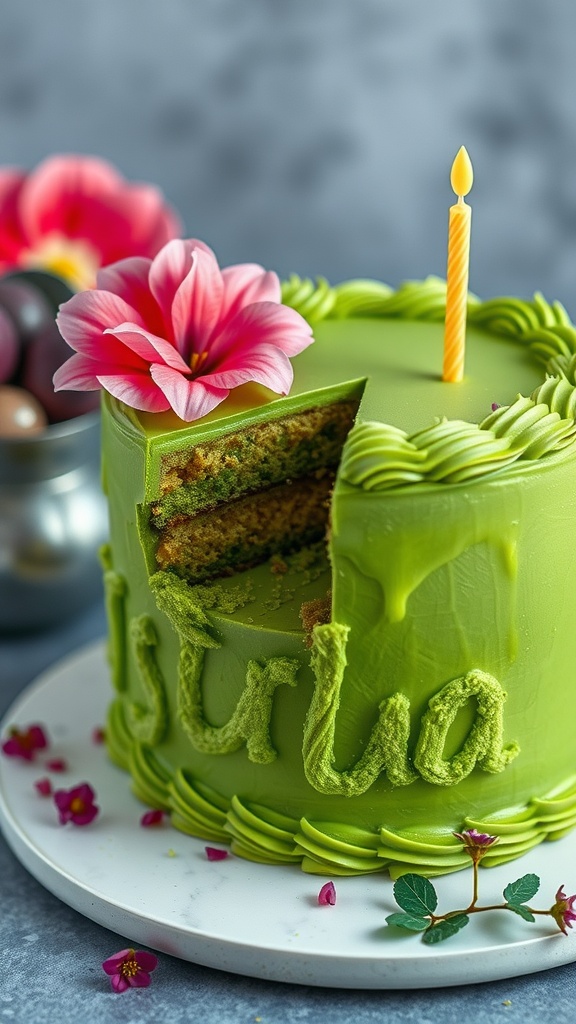
Matcha Green Tea Cake is a delightful twist on traditional birthday cake. With its vibrant green color and unique flavor, this cake stands out at any celebration. The matcha adds a subtle earthy taste, balanced perfectly with sweet frosting, making each bite a treat for your taste buds.
This recipe is straightforward and fun to make, even for beginners. You'll enjoy the process of mixing the ingredients and watching your creation come to life. Plus, it’s a great way to impress your friends and family with something a little different!
Ingredients
- 2 cups all-purpose flour
- 1 1/2 teaspoons baking powder
- 1/2 teaspoon salt
- 1 cup unsalted butter, softened
- 1 cup granulated sugar
- 4 large eggs
- 1/4 cup matcha green tea powder
- 1 teaspoon vanilla extract
- 1 cup buttermilk
- For the frosting:
- 1 cup unsalted butter, softened
- 4 cups powdered sugar
- 2 tablespoons matcha green tea powder
- 2-4 tablespoons milk
- Sprinkles or edible flowers for decoration (optional)
Instructions
- Preheat the oven to 350°F (175°C) and grease two 9-inch round cake pans.
- In a bowl, whisk together flour, baking powder, and salt. Set aside.
- In a large mixing bowl, cream the softened butter and granulated sugar until light and fluffy. Add eggs one at a time, mixing well after each addition.
- Mix in the matcha green tea powder and vanilla extract until fully combined.
- Alternate adding the dry ingredients and buttermilk to the mixture, starting and ending with the dry ingredients. Mix until just combined.
- Pour the batter evenly into the prepared cake pans and smooth the tops. Bake for 25-30 minutes or until a toothpick inserted in the center comes out clean.
- Allow the cakes to cool in the pans for 10 minutes before transferring them to a wire rack to cool completely.
- For the frosting, beat the softened butter until creamy. Gradually add powdered sugar and matcha powder, mixing until smooth. Adjust the consistency with milk as needed.
- Once the cakes are cool, place one cake layer on a serving plate, spread a layer of frosting on top, and then top with the second cake layer. Frost the top and sides of the cake. Decorate with sprinkles or edible flowers if desired.
- Slice and serve your beautiful Matcha Green Tea Cake at your birthday celebration!
S'mores Birthday Cake

This S'mores Birthday Cake brings the classic campfire treat to a whole new level! Imagine layers of moist chocolate cake paired with fluffy marshmallow filling and rich chocolate ganache, creating an indulgent dessert that’s sure to please everyone at the party. The combination of flavors—chocolate, marshmallow, and graham cracker—gives you that warm, nostalgic feeling with every bite.
Making this cake is straightforward, perfect for bakers of all skill levels. With simple steps and easily accessible ingredients, you'll have a stunning cake that looks as fantastic as it tastes. So, gather your friends and get ready to celebrate with this delightful twist on a birthday cake!
Pumpkin Spice Birthday Cake
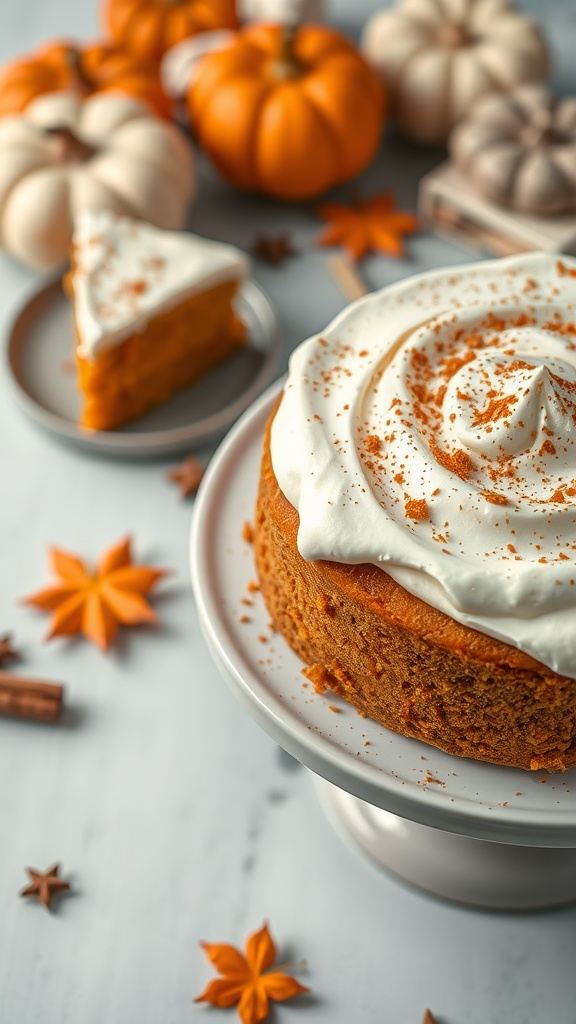
This Pumpkin Spice Birthday Cake is a delightful twist on the traditional birthday treat. It brings together the warm, comforting flavors of pumpkin and spices, making it perfect for any fall celebration. The cake is moist, tender, and topped with a luscious cream cheese frosting that adds a tangy sweetness to each bite.
Making this cake is straightforward, even for beginner bakers. With just a few ingredients, you'll have a beautiful, festive cake that everyone will love. It's an excellent way to celebrate a special day while embracing the flavors of the season!
Ingredients
- 2 cups all-purpose flour
- 1 1/2 teaspoons baking powder
- 1 teaspoon baking soda
- 1 teaspoon ground cinnamon
- 1/2 teaspoon ground nutmeg
- 1/4 teaspoon ground ginger
- 1/4 teaspoon salt
- 1 cup granulated sugar
- 1/2 cup brown sugar, packed
- 1 cup vegetable oil
- 4 large eggs
- 1 cup canned pumpkin puree
- 1 teaspoon vanilla extract
Instructions
- Preheat the oven to 350°F (175°C). Grease and flour two 9-inch round cake pans.
- In a bowl, whisk together the flour, baking powder, baking soda, cinnamon, nutmeg, ginger, and salt.
- In another large bowl, combine the granulated sugar, brown sugar, and vegetable oil. Mix well and then add the eggs, pumpkin puree, and vanilla extract.
- Gradually add the dry ingredients to the wet mixture, stirring until just combined.
- Divide the batter evenly between the prepared pans. Bake for 25-30 minutes or until a toothpick inserted in the center comes out clean.
- Let the cakes cool in the pans for 10 minutes before transferring to wire racks to cool completely.
- Once cooled, frost with cream cheese frosting and enjoy!
Strawberry Shortcake
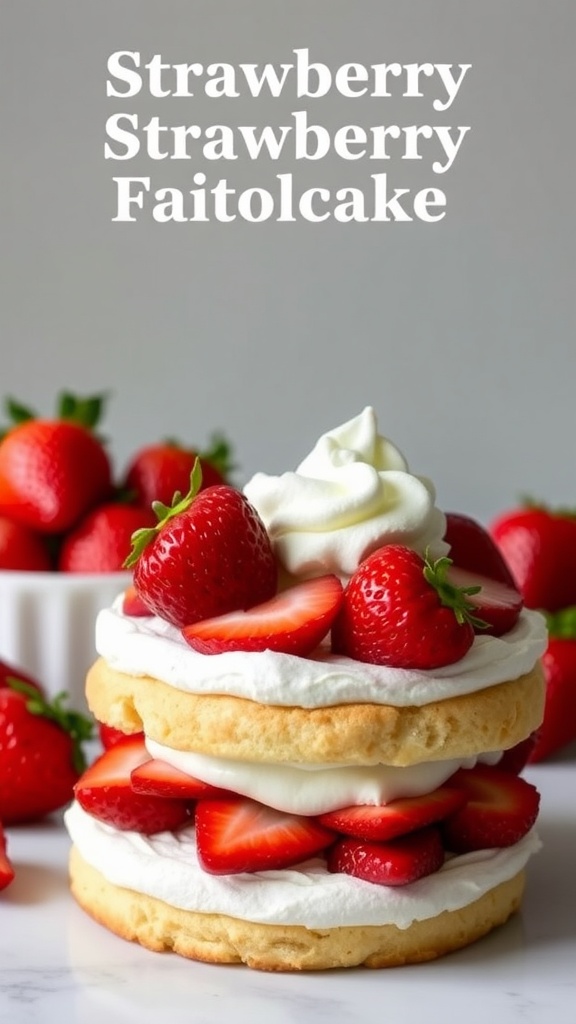
Strawberry shortcake is a light and refreshing dessert perfect for celebrations. With sweet, juicy strawberries layered between fluffy cake and whipped cream, it’s a delightful treat that’s simple to make. The balance of flavors and textures makes it a favorite among both kids and adults.
This recipe allows you to enjoy the taste of summer all year long. It's easy to whip up, making it an ideal choice for any birthday party or special occasion. Get ready to impress your guests with this delicious strawberry shortcake!
Ingredients
- 2 cups all-purpose flour
- 1/4 cup granulated sugar
- 1 tablespoon baking powder
- 1/2 teaspoon salt
- 1/2 cup unsalted butter, cold and cubed
- 1 cup heavy cream
- 1 teaspoon vanilla extract
- 2 cups fresh strawberries, sliced
- 1/4 cup powdered sugar
- Whipped cream for topping
Instructions
- Preheat the oven to 425°F (220°C) and line a baking sheet with parchment paper.
- In a bowl, mix flour, sugar, baking powder, and salt. Cut in the cold butter until the mixture resembles coarse crumbs.
- Stir in heavy cream and vanilla extract until just combined. Do not overmix.
- Turn the dough onto a floured surface and gently knead it a few times. Roll out to about 1-inch thick and cut out round cakes.
- Place the rounds on the baking sheet and bake for 15-20 minutes until golden brown. Let them cool.
- While the cakes cool, mix sliced strawberries with powdered sugar and let them sit for about 10 minutes.
- Assemble by slicing the cakes in half, adding a layer of strawberries and whipped cream in between, and topping with more strawberries and cream. Enjoy!
Cookies and Cream Cake
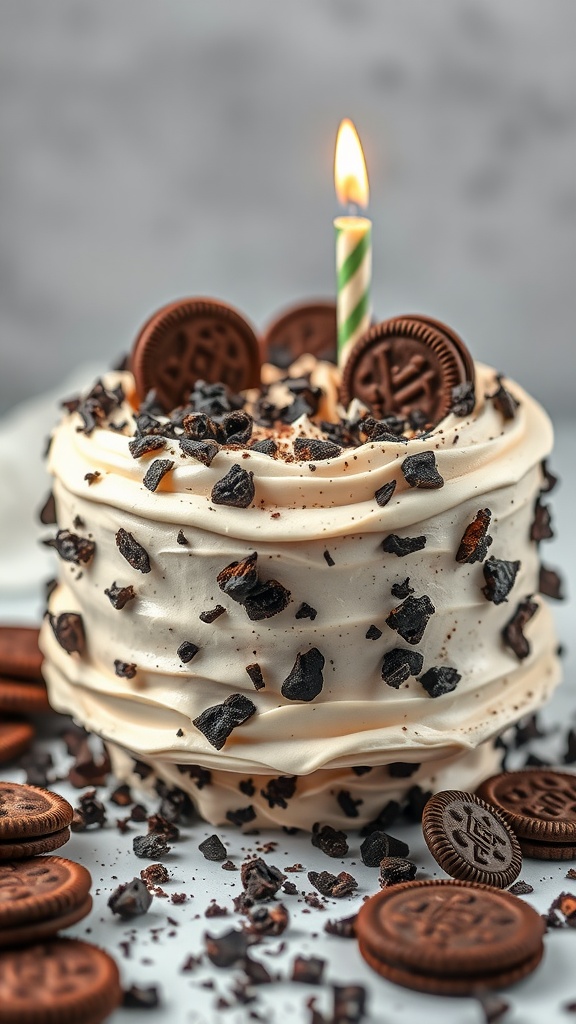
This Cookies and Cream Cake is a delightful treat that combines the rich flavor of chocolate with the creamy goodness of vanilla frosting. Each bite is packed with crunchy cookie bits, making it a fun and indulgent dessert for any birthday celebration. Plus, it's straightforward to whip up, even if you're a beginner in the kitchen!
The layers of moist chocolate cake paired with creamy frosting create a heavenly combination. Topped with crushed cookies, this cake is sure to impress. Get your friends and family excited with this visually appealing and deliciously sweet cake!
Ingredients
- 2 cups all-purpose flour
- 1 3/4 cups granulated sugar
- 3/4 cup unsweetened cocoa powder
- 1 1/2 teaspoons baking powder
- 1 1/2 teaspoons baking soda
- 1 teaspoon salt
- 2 large eggs
- 1 cup whole milk
- 1/2 cup vegetable oil
- 2 teaspoons vanilla extract
- 1 cup boiling water
- 1 cup crushed chocolate sandwich cookies (like Oreos)
- 1 cup unsalted butter, softened
- 4 cups powdered sugar
- 1/4 cup heavy cream
- 1 teaspoon vanilla extract
- Additional crushed cookies for topping
Instructions
- Preheat your oven to 350°F (175°C). Grease and flour two 9-inch round cake pans.
- In a large bowl, mix together the flour, sugar, cocoa powder, baking powder, baking soda, and salt.
- Add in the eggs, milk, oil, and vanilla extract. Beat on medium speed for about 2 minutes until well combined.
- Stir in the boiling water carefully. The batter will be thin, but that’s okay!
- Fold in the crushed cookies until evenly distributed.
- Pour the batter evenly into the prepared pans. Bake for 30-35 minutes or until a toothpick inserted in the center comes out clean.
- Let the cakes cool in the pans for 10 minutes before transferring them to a wire rack to cool completely.
- For the frosting, cream the softened butter until smooth. Gradually add the powdered sugar, mixing on low speed until blended.
- Pour in the heavy cream and vanilla extract. Beat on high for about 3 minutes until fluffy.
- Once the cakes are completely cool, place one layer on a serving plate. Spread a layer of frosting on top, then add the second cake layer.
- Frost the top and sides of the cake with the remaining frosting. Decorate with additional crushed cookies on top.
Chocolate Mint Cake
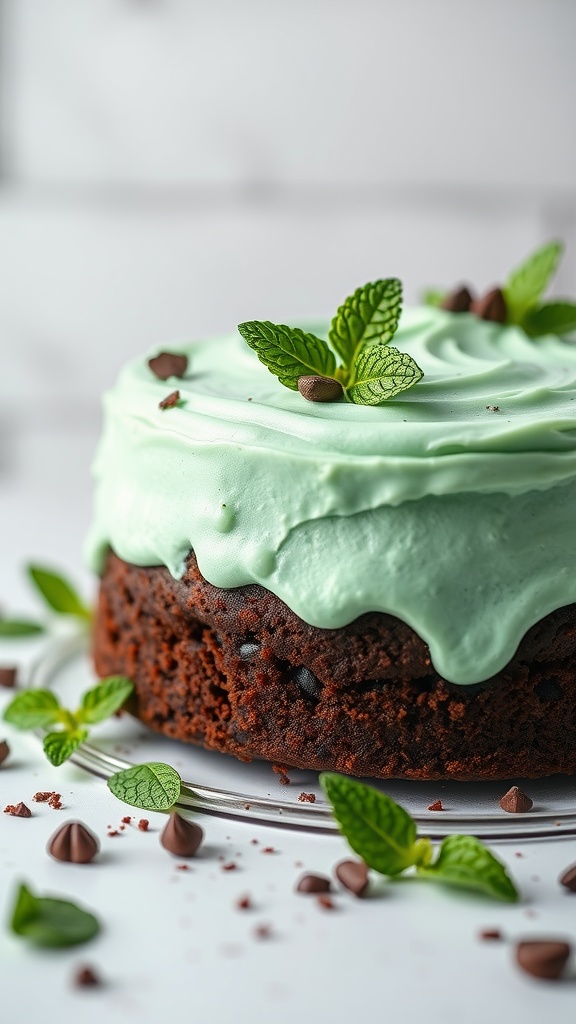
Chocolate mint cake is a delightful treat that perfectly marries rich chocolate flavor with a refreshing hint of mint. This cake is moist and fluffy, making it a favorite for celebrations or just a special dessert at home. It's fun to make, and even novice bakers can create a stunning result with a few simple steps.
The combination of chocolate and mint not only tastes fantastic but also adds a festive touch to any occasion. The cake is usually topped with a minty green frosting, giving it a playful look that everyone will love. Let’s dive into the recipe so you can whip up this delicious cake!
Ingredients
- 1 3/4 cups all-purpose flour
- 3/4 cup unsweetened cocoa powder
- 2 cups granulated sugar
- 1 1/2 teaspoons baking powder
- 1 1/2 teaspoons baking soda
- 1 teaspoon salt
- 2 large eggs
- 1 cup whole milk
- 1/2 cup vegetable oil
- 2 teaspoons pure vanilla extract
- 1 cup boiling water
- 1 cup heavy cream
- 1/4 cup powdered sugar
- 1/2 teaspoon peppermint extract
- Green food coloring (optional)
- Chocolate chips for garnish
Instructions
- Preheat your oven to 350°F (175°C). Grease and flour two 9-inch round cake pans.
- In a large mixing bowl, combine flour, cocoa powder, sugar, baking powder, baking soda, and salt. Mix well.
- Add eggs, milk, oil, and vanilla to the dry ingredients. Beat on medium speed for about 2 minutes. Then stir in the boiling water until well combined.
- Pour the batter evenly into the prepared pans and bake for 30-35 minutes, or until a toothpick inserted in the center comes out clean.
- Let the cakes cool in the pans for 10 minutes, then transfer to wire racks to cool completely.
- For the frosting, whip the heavy cream with powdered sugar and peppermint extract until soft peaks form. Add green food coloring if desired.
- Once the cakes are cool, spread a layer of frosting on the top of one cake layer, then place the second layer on top. Frost the top and sides of the cake.
- Garnish with chocolate chips and serve. Enjoy your chocolate mint cake!
Lavender Honey Cake
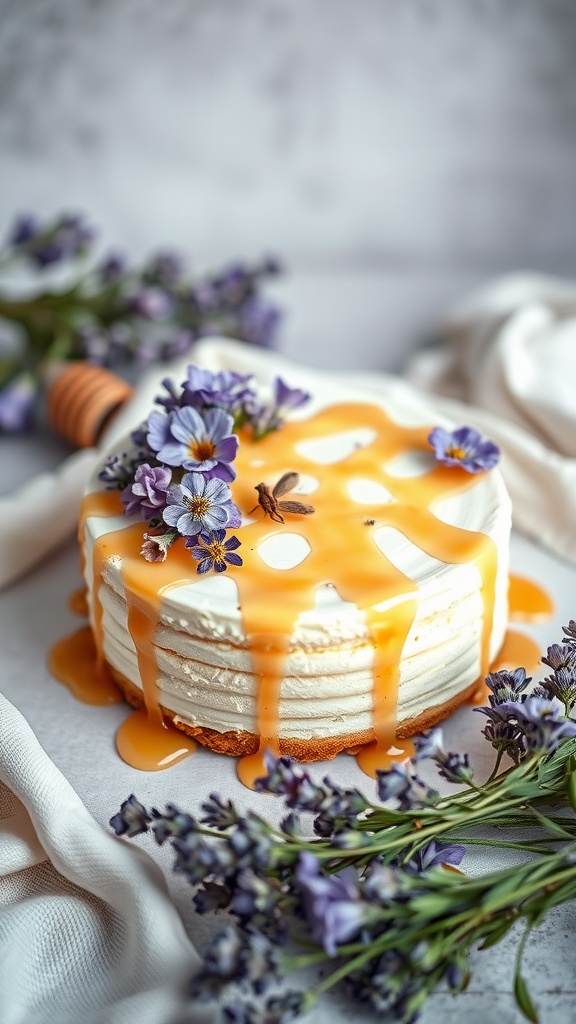
Lavender Honey Cake is a delightful twist on the traditional birthday cake. It combines the sweet, floral notes of lavender with the rich, natural sweetness of honey, creating a flavor profile that's both unique and comforting. This cake is moist and fluffy, making it a perfect choice for celebrations or a cozy afternoon treat.
This recipe is quite simple to prepare, requiring basic baking skills and ingredients you likely already have in your kitchen. The lavender brings an elegant touch, while the honey adds depth, so it's sure to impress your guests without overwhelming you in the kitchen!
Ingredients
- 1 1/2 cups all-purpose flour
- 1 teaspoon baking powder
- 1/2 teaspoon baking soda
- 1/4 teaspoon salt
- 1/2 cup unsalted butter, softened
- 1 cup honey
- 2 large eggs
- 1 teaspoon vanilla extract
- 1/2 cup milk
- 2 tablespoons dried culinary lavender
- 1 cup heavy cream (for frosting)
- 2 tablespoons powdered sugar (for frosting)
- Additional lavender for garnish (optional)
Instructions
- Preheat your oven to 350°F (175°C). Grease and flour a 9-inch round cake pan.
- In a bowl, whisk together flour, baking powder, baking soda, and salt. Set aside.
- In another bowl, cream the softened butter and honey until light and fluffy. Add in eggs one at a time, beating well after each addition. Stir in vanilla.
- Gradually add the flour mixture to the honey mixture, alternating with the milk, starting and ending with the flour. Mix until just combined. Gently fold in the dried lavender.
- Pour the batter into the prepared cake pan and bake for 25-30 minutes, or until a toothpick inserted in the center comes out clean. Let cool in the pan for 10 minutes before transferring to a wire rack to cool completely.
- For the frosting, whip the heavy cream until soft peaks form. Gradually add powdered sugar and continue to whip until stiff peaks form.
- Once the cake has cooled, frost it with the whipped cream and garnish with additional lavender if desired. Serve and enjoy!
Banana Foster Cake
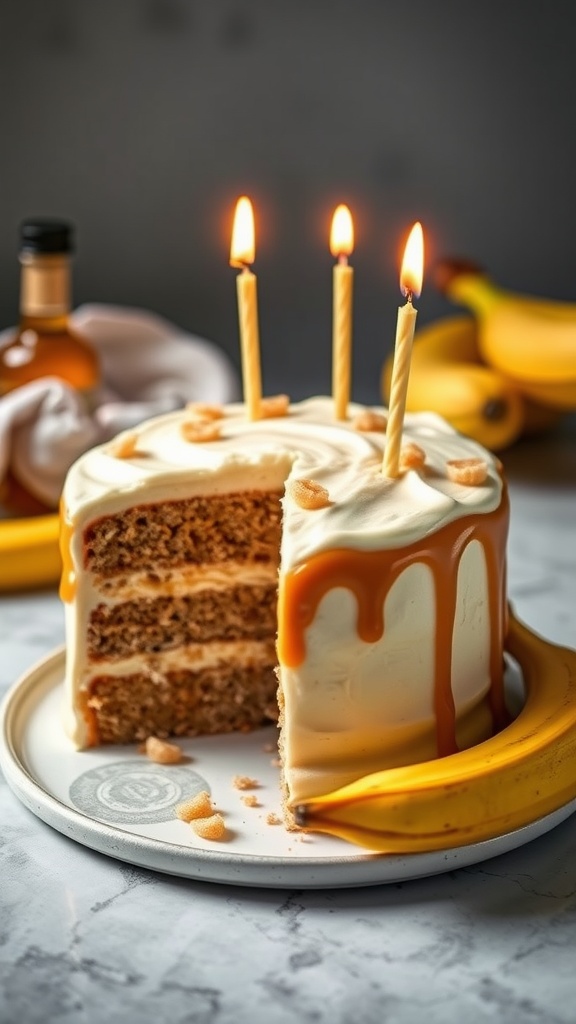
Banana Foster Cake is a delightful twist on the classic dessert, combining the rich flavors of ripe bananas and caramel. This cake is moist, fluffy, and topped with a creamy frosting that enhances the tropical taste. It's perfect for celebrations or just a sweet treat any day of the week.
With simple ingredients and straightforward steps, this cake is easy to make, even for beginner bakers. The combination of bananas and a hint of rum creates a flavor profile that’s both comforting and exciting. Your friends and family will love this unique dessert!
Ingredients
- 2 cups all-purpose flour
- 1 1/2 teaspoons baking powder
- 1/2 teaspoon baking soda
- 1/4 teaspoon salt
- 1/2 cup unsalted butter, softened
- 1 cup granulated sugar
- 1/2 cup brown sugar, packed
- 3 large eggs
- 1 teaspoon vanilla extract
- 1 cup mashed ripe bananas (about 3 bananas)
- 1/4 cup dark rum (optional)
- 1 cup buttermilk
- 1 cup heavy cream
- 1/4 cup powdered sugar
Instructions
- Preheat your oven to 350°F (175°C). Grease and flour three 8-inch round cake pans.
- In a bowl, mix the flour, baking powder, baking soda, and salt. Set aside.
- In another large bowl, beat the butter, granulated sugar, and brown sugar until light and fluffy. Add the eggs one at a time, mixing well after each addition. Stir in the vanilla extract and mashed bananas.
- Gradually add the dry ingredients to the wet mixture, alternating with the buttermilk. Mix until just combined. If using, fold in the dark rum.
- Divide the batter evenly among the prepared pans and bake for 25-30 minutes, or until a toothpick inserted in the center comes out clean.
- Let the cakes cool in the pans for 10 minutes, then turn them out onto wire racks to cool completely.
- For the frosting, whip the heavy cream and powdered sugar together until soft peaks form. Once the cakes are cool, frost between the layers and on top of the cake as desired.
Cherry Almond Cake
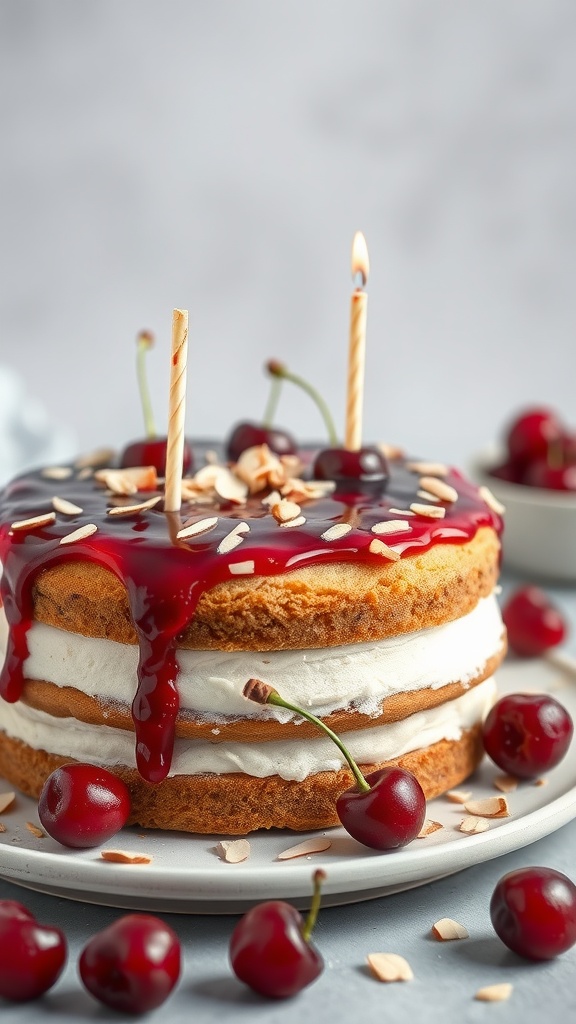
Cherry Almond Cake is a delightful treat that combines the sweet and tart flavors of cherries with the nutty undertones of almond. This cake is not only visually appealing, but it also packs a flavor punch that’s sure to impress at any birthday celebration. It's relatively easy to make, making it perfect for both seasoned bakers and those new to the kitchen.
The soft, moist layers of cake are complemented by a creamy filling and topped with a glossy cherry glaze. Whether you’re celebrating a special day or just treating yourself, this cake is a sweet way to enjoy some time in the kitchen.
Ingredients
- 2 cups all-purpose flour
- 1 1/2 cups granulated sugar
- 1 cup unsalted butter, softened
- 4 large eggs
- 1 teaspoon almond extract
- 1 teaspoon vanilla extract
- 1/2 cup milk
- 2 teaspoons baking powder
- 1/2 teaspoon salt
- 1 cup fresh or canned cherries, pitted
- 1 cup heavy cream
- 1/4 cup powdered sugar
- 1/2 cup cherry pie filling (for topping)
- Almond slivers (for garnish)
Instructions
- Preheat the oven to 350°F (175°C). Grease and flour two 9-inch round cake pans.
- In a large bowl, cream together the butter and sugar until light and fluffy. Add the eggs one at a time, mixing well after each addition.
- Stir in the almond and vanilla extracts. Add the flour, baking powder, and salt to the mixture, alternating with the milk until well combined.
- Fold in the pitted cherries gently into the batter. Divide the batter between the prepared pans.
- Bake for 25-30 minutes or until a toothpick inserted in the center comes out clean. Let the cakes cool in the pans for 10 minutes, then turn them out onto wire racks to cool completely.
- In a separate bowl, whip the heavy cream with powdered sugar until stiff peaks form. Once the cakes are cool, place one layer on a serving plate and spread a layer of whipped cream on top.
- Place the second cake layer on top and spread the cherry pie filling over it. Garnish with almond slivers.
Vanilla Bean Pound Cake
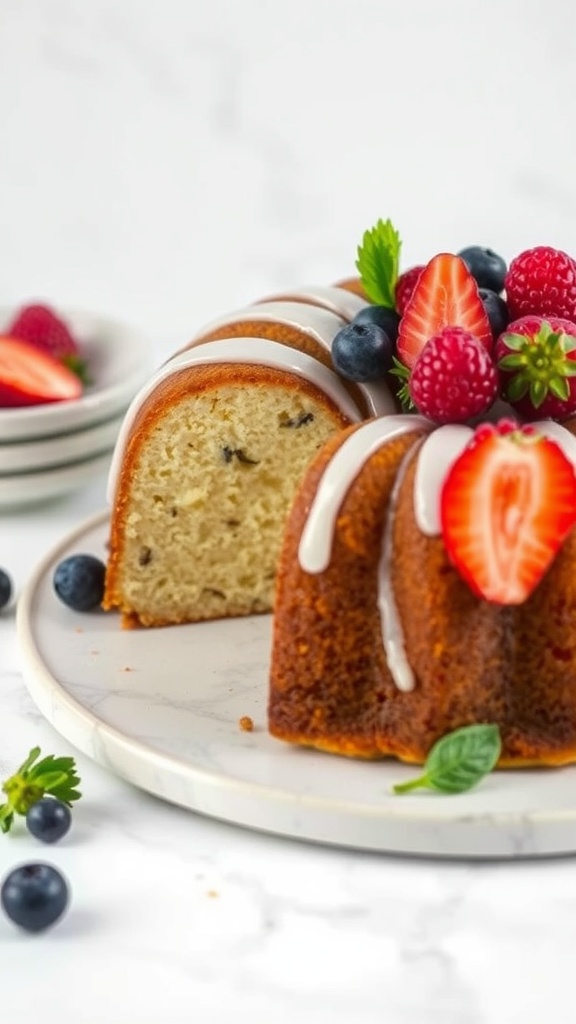
Vanilla bean pound cake is a classic treat that captures the essence of simplicity and flavor. Its rich and buttery taste is enhanced by the tiny flecks of real vanilla bean, giving each slice a delightful aroma. This cake is perfect for celebrations, especially birthdays, making it a popular choice for those sweet moments.
Making this pound cake is straightforward and requires minimal ingredients. With just a bit of mixing and baking, you’ll have a moist and tender cake that pairs wonderfully with fresh fruits or a light glaze. It’s a sure way to impress guests while keeping the baking process easy!
Ingredients
- 1 cup unsalted butter, softened
- 2 cups granulated sugar
- 4 large eggs
- 2 teaspoons vanilla extract
- 1 vanilla bean, split and seeds scraped
- 3 cups all-purpose flour
- 1 teaspoon baking powder
- 1/2 teaspoon salt
- 1 cup milk
Instructions
- Preheat your oven to 350°F (175°C). Grease and flour a bundt pan.
- In a large mixing bowl, cream together the softened butter and granulated sugar until light and fluffy. Add the eggs one at a time, mixing well after each addition.
- Stir in the vanilla extract and the seeds from the vanilla bean.
- In another bowl, whisk together the flour, baking powder, and salt. Gradually add this mixture to the butter mixture, alternating with the milk, beginning and ending with the flour mixture. Mix until just combined.
- Pour the batter into the prepared bundt pan. Bake for 60-70 minutes, or until a toothpick inserted in the center comes out clean.
- Let the cake cool in the pan for 10 minutes before transferring to a wire rack to cool completely.
Orange Creamsicle Cake

Orange Creamsicle Cake is a delightful treat that captures the nostalgic flavor of orange popsicles. This cake features layers of soft, orange-flavored cake paired with a creamy frosting that brings a refreshing finish. It's a perfect dessert for any celebration, especially birthdays, and is simple enough for anyone to make!
With its bright orange hue and smooth, sweet frosting, this cake not only tastes amazing but looks stunning on any table. The combination of citrus and cream makes it a crowd-pleaser. Get ready to impress your friends and family with this delightful cake!
Ingredients
- 2 1/2 cups all-purpose flour
- 1 1/2 cups granulated sugar
- 1 tablespoon baking powder
- 1/2 teaspoon salt
- 1 cup unsalted butter, softened
- 4 large eggs
- 1 cup buttermilk
- 1 tablespoon vanilla extract
- 1 tablespoon orange zest
- 1/2 cup orange juice
- 2 cups heavy cream
- 1/2 cup powdered sugar
- 1 teaspoon orange extract
- Orange slices for decoration
Instructions
- Preheat the oven to 350°F (175°C). Grease and flour three 8-inch round cake pans.
- In a large bowl, mix flour, sugar, baking powder, and salt. Add in softened butter and beat until crumbly.
- In another bowl, whisk together eggs, buttermilk, vanilla extract, orange zest, and orange juice. Gradually mix this into the dry ingredients until smooth.
- Divide the batter evenly among the prepared pans and bake for 25-30 minutes or until a toothpick comes out clean.
- Let the cakes cool in the pans for 10 minutes before transferring to wire racks to cool completely.
- For the frosting, beat heavy cream until soft peaks form. Gradually add powdered sugar and orange extract, continuing to beat until stiff peaks form.
- Once the cakes are cool, layer them with frosting in between each layer and on top. Decorate with orange slices.
Comments
Post a Comment